I for one would just like to sit back and let it work for me without worry, care, or interruption. I have found that it just doesn’t work that way. If we are to become proficient users, we need to become savvy with our computer equipment. Just like cameras, lenses, F-stops, shutter speed, and aperture, we must know how one component affects another.
One photography club member recently asked me why computers needed so much horsepower to process image files efficiently. He wanted to know if it was possible to upgrade his laptop. Here is a brief answer:
Processing images in computer software today requires more horsepower than ever. The software installation itself is several hundred MB.
Image files from today’s cameras files can often exceed 50 MB. So, memory capacity is required at an exponential rate. It is not long before we acquire tens, if not thousands, of images. That also requires a lot of storage. And to create a redundant backup- twice that.
So, the solution is a robust computer designed and built with the components for our work.
Gone are the days where off-the-shelf laptops can do the job of modern photo editing with Lightroom, Photoshop, and Camera Raw.
Ideally there must be two or more hard drives installed. One drive for the Operating System and the Software ONLY. And another (or more) for files and documents. These should be 2 TB or larger and preferably solid state drives.
Then we need a hefty processor that will manage the work efficiently. INTEL or AMD processors with six, eight or more cores, running at 4.0 GHz or more, are now minimum.
All the data is temporarily held in and operated from RAM (Random Access Memory). 64MB of RAM is minimal, twice that optimal. It also takes a robust Mother Board and Video Graphics Card (with its own memory) to manage all that.
Now, all that stuff creates heat, the enemy of electronics. The computer case requires a lot of empty space in it through which to move air in large volumes. Therefore, the system needs lots of large fans.
Bottom line: YOU CAN’T GET ALL THIS IN A LAPTOP.
Therefore, you need to find one off the shelf that is built for gaming or design/build one customized for your needs. You may spend $2,000 or more..
Modern digital cameras have multiple benefits for wildlife photographers. And there is a plethora to select from. The undisputed type is a single lens camera that focuses, composes, and meters the exposure through the lens. The ability to interchange a variety of lenses is of ultimate importance. That provides the ability to change the optic dependent upon need from ultra closeups or macro, to long telephoto lenses for distant wildlife.
Types
There are two basic types to select from: the Digital Single Lens Reflex or DSLR, or the Mirrorless Single Lens camera. Both types make exceptional images. Most manufacturers like Nikon, Canon, Sony, Pentax, and Fuji make both types and in several price points. Let’s look at the features of each type.
Digital Single Lens Reflex Camera or DSLR
This camera type derives its name because it has one lens to do everything. Viewing, composition, focusing and metering the exposure through the lens is accomplished with the use of a mirror that reflects the image to the eye through a prism that projects the image into the viewfinder. During the actual exposure, the mirror folds up out of the image path to the photosensitive sensor.
The camera accommodates the changing of lenses to suit the task at hand. Many different lenses are available.
This type of camera has been around for about seventy years, with refinements made by every manufacturer each year.
Digital Mirrorless Single Lens Camera
Unlike the DSLR, this camera has no mirror in the image path, hence the name. Instead, the image is focused on the sensor which, in turn, provides an image to a small electronic monitor within the eyepiece. Therefore, most of the camera’s operation is electronic, rather than mechanical.
This concept has advantages for the nature photographer as the electronic shutter can capture images at a greater frame rate than its mechanical cousin.
Which Type is Better?
There are many features of every camera make and model that are too numerous to mention. While every modern digital camera can make excellent images, there are some features that may make a difference to the buyer and their needs.
Full-Frame vs. Crop Sensor
A full-frame camera has a sensor size that closely compares in physical dimensions with the standard 35mm fill frame. That is about 24 x 36 mm. A crop sensor is physically sized slightly smaller (about 18 x 24 mm) than the full-frame sensor. That provides approximately 50 percent more capture area behind the lens. That means that with any given lens, the area of capture, or field of view, is reduced from that of a full-frame sensor. That is not a deficiency by any means, it simply means that to capture the same area of landscape, one simply must step back. There is no change in image magnification unless the lens or attachments are changed.
The noticeable difference is that new crop sensor cameras may be less expensive.
Image Resolution
The ability of a lens and sensor to resolve small details is of great importance in comparing cameras. Taking the lens and it quality from the equation, leaves the resolution of the sensor. This is measured in two ways, the number of photo sensitive pixels of the sensor and the pixel size.
Cameras and their sensors are measured in MegaPixels, or how many are on the sensor. Pixel size is just that-the physical size of each pixel. As a general rule, more megapixel sensors may produce images with greater resolution. However, some crop sensors may have more pixels per square millimeter, providing greater resolution.
Pixel size affects resolution in signal to noise ratio, image detail. and dynamic range. Generally speaking, larger pixels provide improvement in each of these three categories.
Frame Rate
Because mirrorless cameras may have no mechanical shutter, they are able to capture images at a greatly increased frame rate. Modern DSLRs can operate with fresh batteries at a frame rate of 10-15 frames per second. Mirrorless cameras may operate at 200 frames per second. This is a major advantage to the wildlife photographer capturing images of subjects in motion.
Battery Power
Battery technology has improved dramatically in the recent past providing longer operating life, fewer issues with charging “memory”, and cost.
Needless to say, a fully electronic camera may draw more power during use than mechanical cameras, therefore shorter battery life. The competitive tradeoff between cameras has to be measured in other characteristics.
Lenses
Because DSLRs have been around much longer, the variety of available lenses ai freat. Mirrorless camera manufacturers are rapidly catching up. Additionally, adapters are available for mounting older lenses on new mirrorless camera bodies.
One characteristic of newer mirrorless lenses is that with many manufacturers, the maximum diameter of the class is increased providing the ability to manufacture a lens with a much grater maximum aperture. It is not within the realm of possibility to make lenses with apertures of F1.1 or greater.
Bottom Line
The answer for most photographers comes to cost. Mirrorless cameras are a new breed and may be more expensive in comparison. There are more lenses and accessories available to DSLR owners.
However, the trend is definitely shifting to mirrorless. Some favorite DSLRs are no longer manufactured. But the used market is huge.
If I were to make a recommendation, it would be this: If you have a large investment in DSLR cameras, lenses and accessories and it performs to your needs, stay with the DSLR and make your investment in newer, and better glass.
If, however, you are young in photography and your investment is nil or small, then the idea of a mirrorless system is probably a good idea. Start with a more inexpensive body and make your largest investment in the best glass you can afford.
A time lapse image or video is actually a optical illusion. It is a series of images taken over a long period of time and replayed over a much shorter period.
For example, the time lapse above of a Magnolia Flower (Magnolia floribunda) was a selection from a series of 1,246 digital still images taken between 7:37 AM and 11:23 AM. Therefore, almost four hours of activity was replayed in nine seconds.
When you consider a video or motion picture “movie”, you are experiencing the visual merging of many images played back at a speed from 24 frames per second (fps) up to 30 or 50 fps for some video formats. So the 1,246 frames taken of the Magnolia flower at 30 fps would be just over 40 seconds. So, the video above was a selection of every fourth image made to shorten the final piece to the nine second version.
Time lapse sequences are not difficult to produce. Many digital cameras today are capable of shooting time lapse series. Many have built-in intervalometers. An intervalometer is a timing function that allows the operator to select the number of frames desired, the length of the frame exposure and the interval between frames.
For those cameras that have no intervalometer, brand name and third-party units are available for most cameras. The Nikon MC-36 intervalometer is shown above.
The setup used for this series included a Nikon D850 DSLR camera, Nikkor 105mm F 2.8 macro lens, Nikon SB-910 Speedlight off-camera flash with Lastolite 8 X 8 inch softbox, and a 30 inch circular diffuser.
The objective here was to achieve consistent exposure frame-to-frame throughout the morning. The diffuser blocked the direct and constantly moving sunlight on the flower. The camera was set up in manual exposure and manual focus. The exposure was 1/250 sec at F 8 at ISO 200 to emphasize the constant manual output of the flash. So, with that exposure set, the intervalometer was set on one frame every 30 seconds and for an unlimited number of frames.
Framing and composition needed to be horizontal and take into consideration the space required for the moving flower petals until maximum opening.
Attention must be given to the duration of the photography session. Plan for sufficient battery power for the camera, the intervalometer and the flash unit.
The flower was observed for several days as well as others during the period of opening. The morning of opening was inferred by these previous openings. The exposure series was started just at the time of the opening process and concluded when it was felt the opening finished.
The images were finished in Lightroom and Photoshop Camera Raw. The were converted from NEF RAW files to JPGs for ease of manipulation through the software. The animated GIF (above) was completed in Photoshop. Other software, including Adobe Premiere, LRTimelapse, and others can do a exemplary job as well.
A honey bee image focus stacked with 50 images. Impossible without subject stability.
In macro photography we have all learned that image sharpness is a tricky thing to achieve to perfection. Because of the very nature of macro, that is moving very close and magnifying the subject on the camera’s sensor, there are several issues that affect overall image sharpness.
In macro there are several conditions that affect subject sharpness:
Lens Focus
Depth of Field
Shutter Speed
Illumination Intensity
Camera Movement, and
Subject Movement.
At this point, this discussion will address the last two of the list above. That is not to say that the others are not important, they certainly are. But camera and subject movement are large culprits in not achieving sharp images.
Because the image details are magnified, the slightest movements of camera and/or subject are also magnified, resulting in images that are not tack sharp. Therefore, this will address eliminating camera movement and subject movement as two separate issues.
CAMERA MOVEMENT
In macro photographic imaging everything in the system from the sensor to the subject must be bolted down and must be rock solid. The first issue is to assure the camera is free from movements and vibrations during the focus and exposure process. The first step is to assure the camera is mounted on a heavy and sturdy tripod. This may vary from field to lab or studio, but a tripod that will prevent camera shake is a must.
Some years ago, a friend was appalled that their first “good” tripod was sixty-nine dollars. In today’s environment, a good tripod and head may cost ten times that much, or more. The ideal tripod will have tubular legs in several sections, be made of an aluminum alloy or carbon fiber, have solid leg adjustments, and legs that may be set to various angles to facilitate getting close to the ground or setting up on uneven terrain.
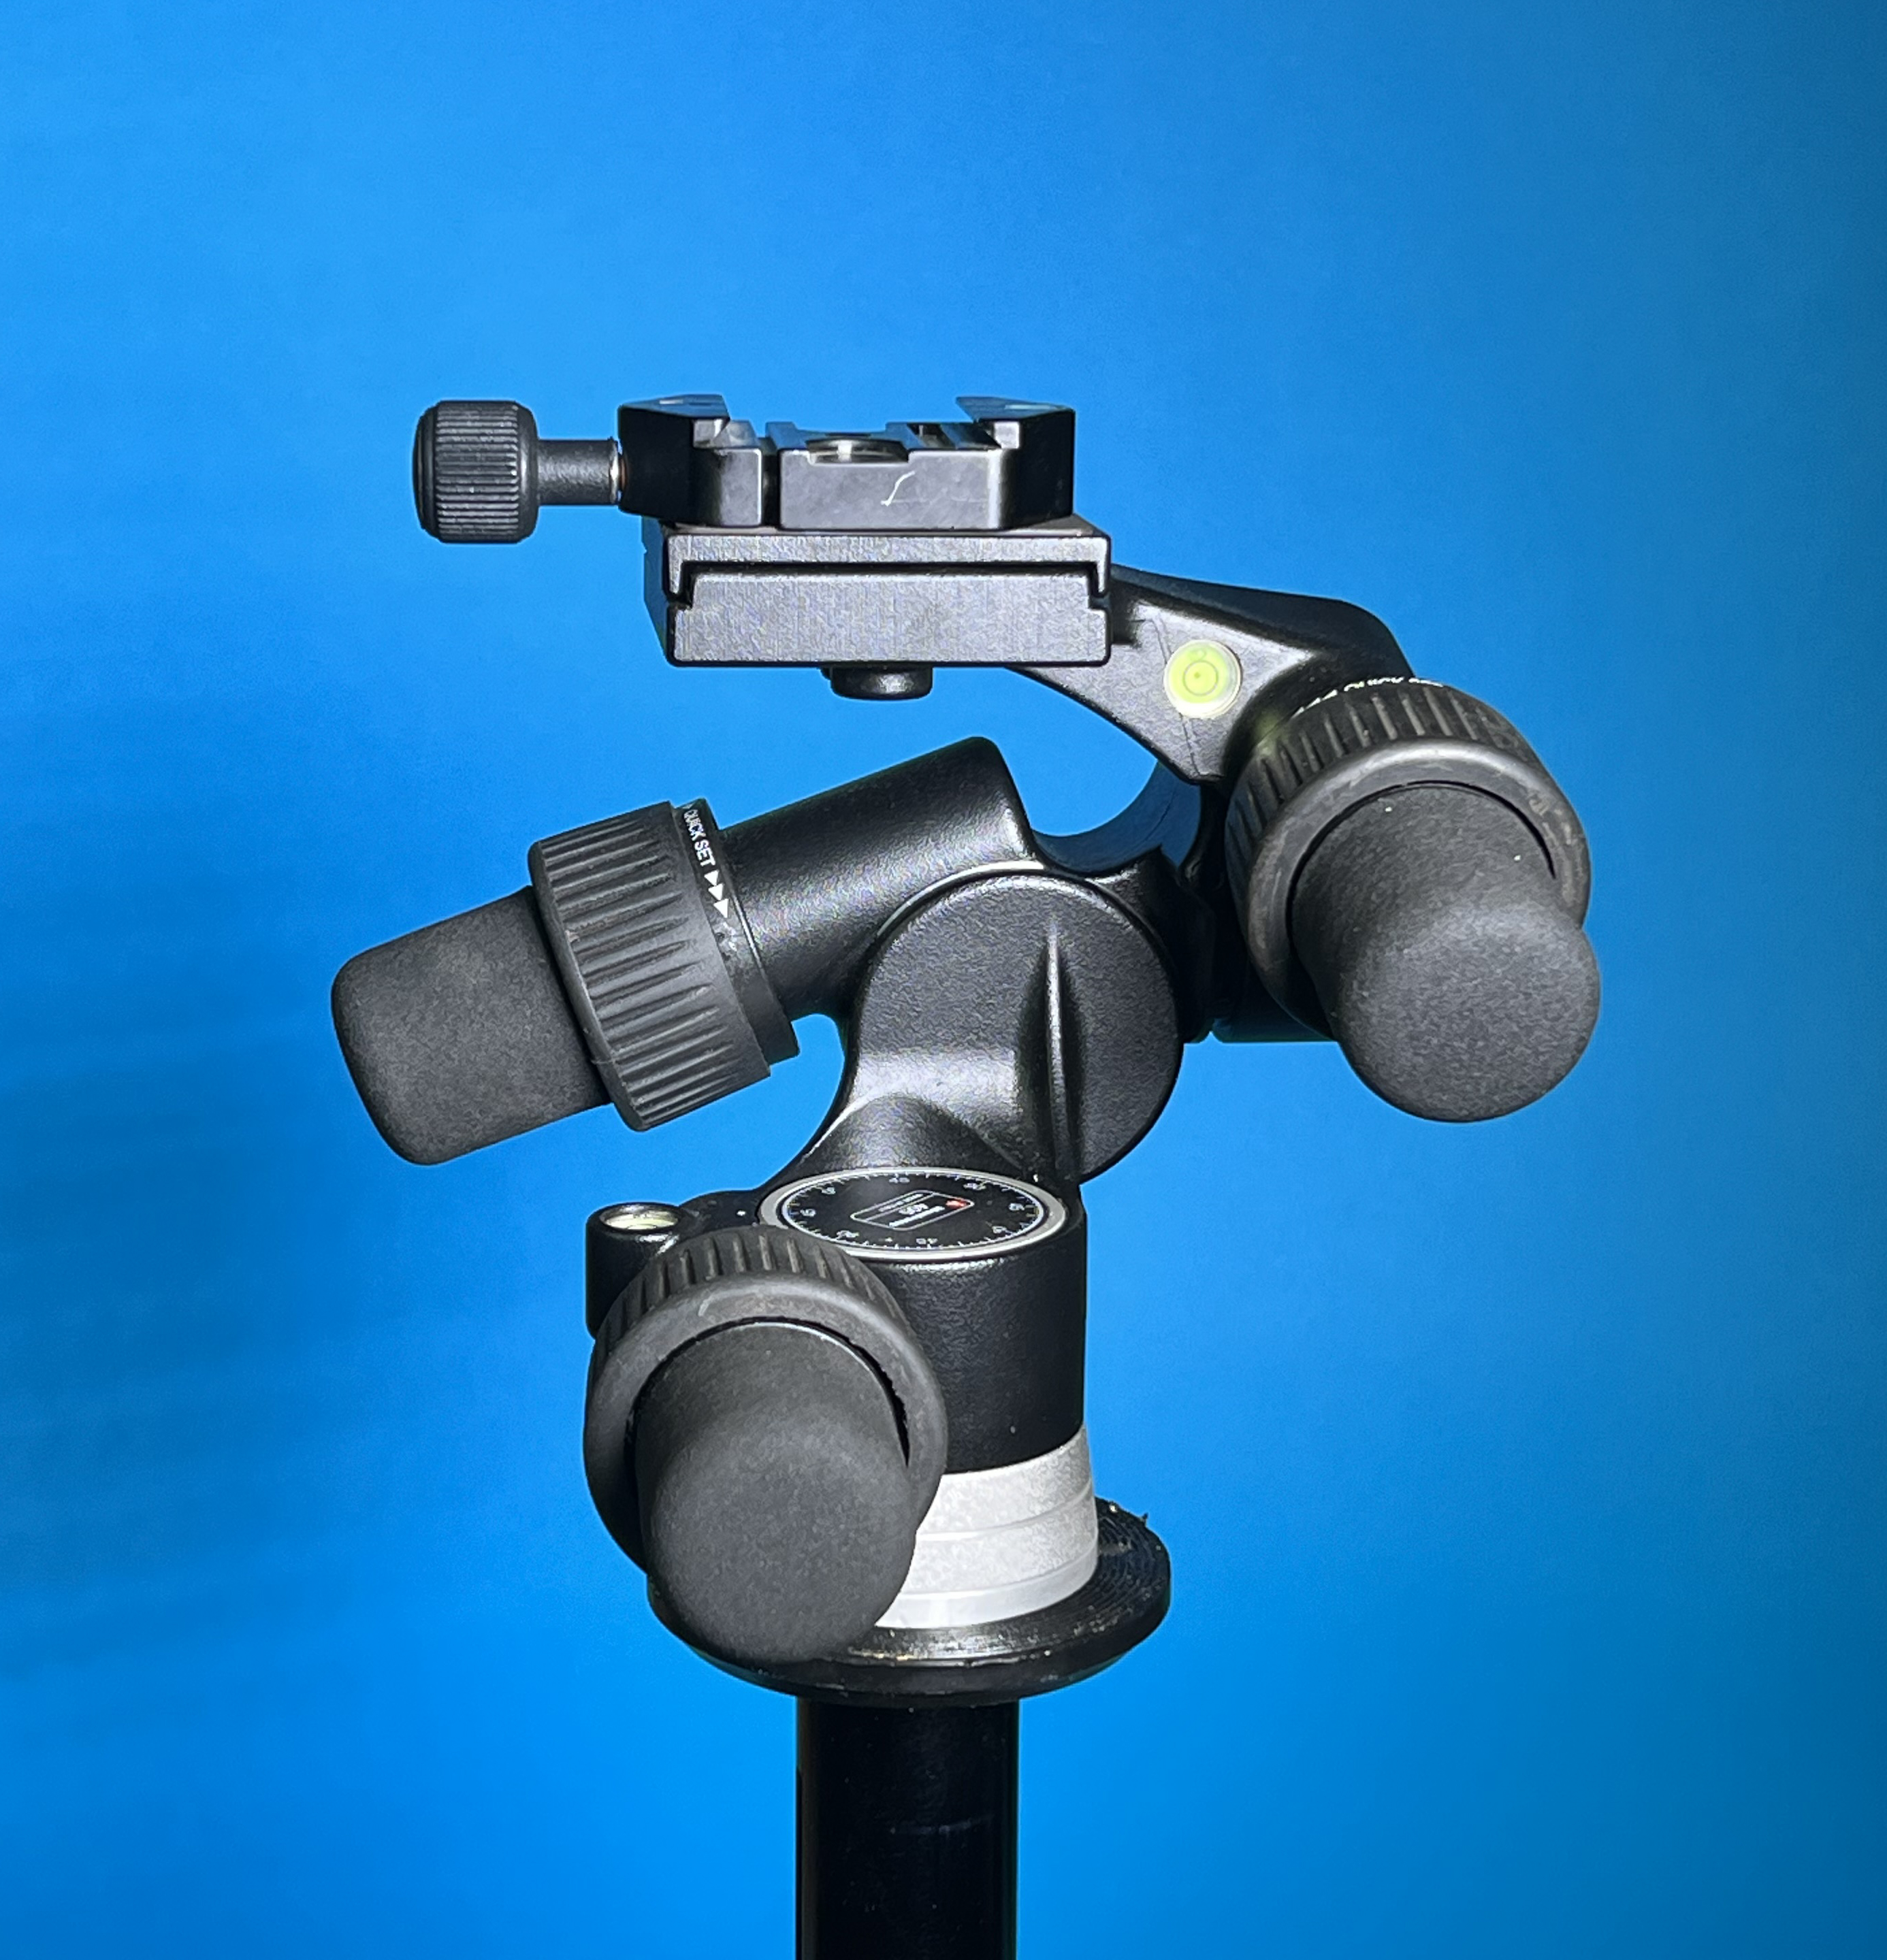
Tripod with Manfrotto geared head.
Ideally, the tripod should also have a Quick Release system and a geared head. Lighter tripods, especially those of carbon fiber, have a hook to hang a weight on to help eliminate vibrations.
Invariably, handling the tripod mounted camera will also create vibrations. To eliminate those vibrations, incorporate an electronic cable release and lock up the mirror after focus and composition are achieved.to prevent internal mechanical vibrations. Also turn off Vibration Reduction or Image Stabilization because many of those mechanism may cause the stabilization unit to “hunt”, creating some internal lens blur.
Nikon intervalometer may be used for hands-off camera photography plus timing of long exposures and intervals between exposures.
Additionally, focusing the camera at life-size or 1:1 or greater magnifications by moving the camera to and from the subject will also create unwanted movement and even spoiled compositions. In this case a very smooth focusing rail is an important accessory. With the turn of a knob or crank, very small increments of adjustment are possible without unwanted movement.
NiSi linear screw focusing rail is a very economical and precise piece of equipment. Other manufacturers also make good units. Search for good quality before you purchase.
Another product is the two-directional focusing rail. At this time, I have not found one to be really that good in manufacture. They generally have a geared, rack and pinion movement. This movement is not a smooth, nor incremental, in the preciseness due to the large gear dimensions. In some cases, these rails may serve best to move subjects, rather than the camera.
A very cheaply manufactured focusing rail. Best for moving a subject rather than a camera.
And it is important to note here that the floor upon which the tripod sits must be solid. Wooden floors in older buildings on pier and beam construction or upper floors may move simply by walking around or moving your feet. Even carpeted floors have some “give” in the surface leading to instability of the tripod. The ideal is a concrete slab construction. That is also true of subject movement that will be addressed next.
If photography is to be accomplished in the vertical axis, an ideal studio/lab piece of equipment is a vertical copy stand. This will provide stable camera placement. To augment the stand’s movement, a good focusing rail may be mounted, providing minute camera movements in the vertical axis.
SUBJECT MOVEMENT
Again, consideration must be given to the construction of the floor upon which the subject sits. The most stable is concrete slab construction or solid ground outdoors.
The next consideration is the table for the subject. It too, should be heavy and sturdy. I find that wooden tables with large diameter legs work best. Some macro photographers even prefer to use a slab of heavy steel or granite to use as a table top it increase weight and thus, stability. The table should be small enough to move around with ease so as not to bump a fragile set. The height should be about waist, or counter height. This depends on whether the photographer prefers to work sitting or standing.
Next in the list of considerations, is the platform that holds the subject. Since we are considering macro, or at least close-up, the subject is probably small. This will stimulate some innovative thinking about subject stabilization and positioning in very small increments.
XYZ and Rotational stage. This precise devise provides tiny, measurable movement in three axes.
An ideal piece of equipment is a small platform that can move in four axes, left-to-right, front-to-back, and up-and-down. Another axis is rotational about a central point. There are several commercial products for this; one being a micrometer XYZ linear positioning stage with a rotational platform. These devices can become quite expensive, yet extremely functional, depending on the size, magnification, movement, and type of work accomplished.
Another commercial product is a lab jack. This is a platform operated with a cranked scissors lift. It provides movement only up and down. Although somewhat coarse in adjustment, it provides a reasonable change in the vertical axis.
Another commercial option is a Pana-Vice, a vice mounted on a ball head providing a variety of stable movements. Fitted with a micrometer stage, this will work nicely for focus stacking of even tiny subjects.
A Pana-Vice is available from electronic retailers.
On the do-it-yourself (DIY) end is a cannibalized microscope base with a XY specimen table and course and fine focus adjustments. This automatically provides XYZ axis movement.
Salvaged base and stage from a discarded microscope.
Another DIY aid is a “Lazy Susan”, made from two pieces of lumber with a rotating ring from the local big-box hardware store. While not perfect for small, incremental adjustments, this works well with a Pana-Vice or lab jack for rotational movements.
The ultimate in macro/micro photography is a software controlled, motorized focusing rail. Manufactured by various firms, these rails allow very small, incremental movements as little as 5 micrometers per image, or less. While somewhat costly, these systems will significantly improve results and speed up the process if the work requires doing so in volume.
Micro photography system using a Cognisys Stack Shot motorized rail, a 10X microscope lens, and a 200mm macro lens as a relay lens. This unit produces images at ten times life-size on the sensor and movements as little as 1 micrometer (micron).
HELPFUL ACCESSORIES
In macro photography in the lab, like any table-top photography, there are many accessories available to make the work easier or perhaps, less frustrating.
The first item is a machinist’s block, or rectangular billet of steel. These are most useful for providing a weight to keep items in position. They may be also used under materials to lift them up.
A frequent and important use is to support magnetic flexible arms to hold subjects, accessories, reflector cards, and so forth.
Another DIY tool is a length of flexible copper wire mounted on a wood block with an alligator clamp soldered to the end. These may hold reflector cards, flags, mirrors, or other materials.
Most useful are tools called “Helping Hands”. These are commonly heavy bases with articulated arms with small clamps on the end. They are invaluable for positioning anything small for multiple reasons.
One cannot function without a large assortment of various clamps. From A-type spring clamps to common close pins, clamps are any photographer’s best friend.
A variety of clamps are available from hardware stores and office supply retailers.
One common use of an A-type spring clamp is to hold a piece of card material for a local reflector, or flag to modify a light source near the subject.
An A clamp with a foil reflector.
Another great tool is a miniature articulated arm. Like the large arms and grip clamps, these are about seven to ten inches long. Many come with standard tripod threads (¼ in x 20 tpi) and cam be screwed int a breadboard for support. These are strong enough to hold a speedlight flash.
Mini ball heads in various sizes can be used for mounting flashes, reflectors, scrims, or any type of modifier. They may be used in combination with the articulating arm for versatile positioning of table-top materials.
Several small weights are a handy table-top tool. These are useful for holding down materials that are subject to falling over, or to hold the corners of fabric or paper backgrounds or surfaces.
Another DIY tool is a background holder to support printed backgrounds on a small table-top set. Produced from a couple of wood pieces and a screw, they are most valuable.
Subject Stability and Positioning in Macro Photography
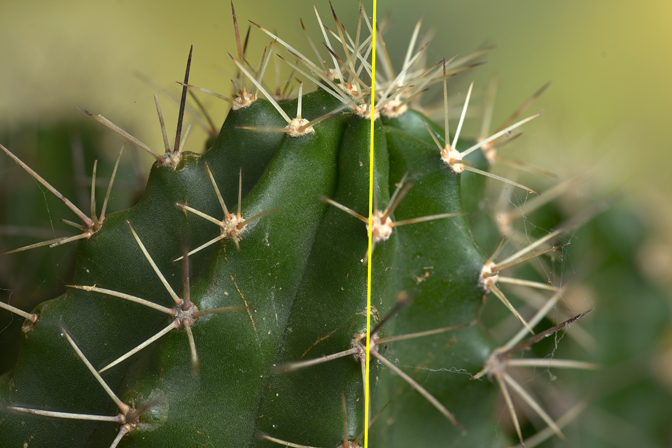
Combination image of cactus with spines. Deep focus stack with 28 images, front to back, (left) and single image from center of stack (right). Nikon D800, 105 mm F2.8 Micro Nikkor, SB 910 flash and circular diffuser.
There are many times when a single image, even at the smallest aperture simply will not produce enough depth of field (DoF) to render the image sharply. This is regardless of the lens quality, camera or technique. The image above is a demonstration from a recent Nature and Macro Photography Workshop.
We have learned that DoF is dependent primarily on Aperture. (The bigger the aperture number; the bigger the DoF.) But DoF is also dependent upon Subject Distance, and lens Focal Length. As we get closer to the image and increase our lens focal length in macro photography, the total measured distance of the DoF gets smaller. Working in close-up am macro photography we are working against ourselves when it comes to DoF. Therefore, we need to improve upon this fault.
To extend the DoF we can now rely upon computer blending of several images into one with greatly extended DoF. Each image is focused at a different distance from the lens. An additional benefit of this technique is the use of a middle range, somewhat sharper aperture. When blended in computer software, part of the resultant image uses near focus detail, part uses mid-focus detail and another uses far focus detail, and so on. Often, as many as 10 or more sequential images are “stacked” and blended into one.
This blending process can include the use of multiple layers in Photoshop or free software called CombineZ or Zyrene Stacker. However, the most powerful software and today’s industry standard is Helicon Focus. The current version is 6.3.7 and its cost ranges from $30 to $200 depending on length of subscription service and number of computers licensed.
Nikon D2Xs, 50 mm flat field EL Nikkor lens on bellows, two SB-800 flashes, tripod. Image magnification in camera: 1.6X.
In this image (above) of the head of a bee 53 individual images with a different point of focus from the antennae to the rear of the head were made. Each image was spaced 0.005 inch from one another from the front to the back. These multiple images spanned the overall distance of o.265 inch, (or about a quarter of an inch).
So as you can see, focus stacking can help produce a little more DoF or a great amount as in the bee. It is also useful in landscape photography to produce foreground, midground and background in equally sharp focus.
Needless to say, light is of paramount importance in photography. The word photography is translated from the Greek as “writing with light.” Without light, photography would be most difficult indeed.
Light does a lot for us in our image making. It allows making the very basic exposure itself. It provides shape, form, texture and dimension. The management of light helps us to render our subject with the most emphasis where desired. We’ll look at these ideas in a moment.
To further understand light we need to remember that it has several vastly important characteristics:
Light has intensity, or the characteristic of brightness. That characteristic requires us to produce a proper exposure using our camera meter, setting shutter speed aperture and ISO.
Light has color, the inherent wave length or color temperature of the light as it illuminates the subject. This color requires us to manage White Balance.
Light has direction, the angle that it strikes the subject. Front light, side light and backlight all have important uses in rendering our subject with the best results, and finally,
Light has quality. This characteristic is perhaps one of the most important. Light may be very soft and pleasing or hard, high contrast and very unflattering. Of all the light characteristics, the management of this quality of light requires our utmost effort.
Of all the light characteristics, the camera can manage intensity and color, but we need to be careful to manage light’s quality and direction to achieve the optimum reproduction of our subject. Unfortunately, I see a lack of lighting management in these two areas quite frequently. Let’s look at some ideas.
First let’s understand that light in itself helps us produce a shape but shadow helps us create form and dimension. We really need to manage both in the creation of quality images. I know that shadows are often bad; they may block up detail and detract from the image. And, often we appreciate images that are virtually shadow-free. I have written a piece for a shadow-less light application for small close-up and macro subjects. You may read it here.
Lighting direction is important to use in making our images. Front light gives us shape and form. Light from over our camera or shoulder can reveal a lot about our subject. As light wraps around the subject features, the variations in intensity, or falloff, tells us a lot about the features of the subject. But this comes with a price. Front light is often flat, that is, lacking in contrast. This low contrast lighting fails to give adequate details of the subject surface.
Therefore, lighting direction is most important when attempting to bring out the most subject details. Three lighting techniques are important to learn: Axial (Front), Side and Back.
With axial lighting the light source is at the lens or close to it and illuminates the subject directly on the front surface. (See Diagram Below) The image of the Overcup oak acorns below is lit with an off-camera Speedlight flash in a small softbox right up against the lens. While it produces a nice image, it is somewhat flat and lacks the contrast to illustrate the detail at its best.
Side light, corrects this failure of front light. In fact, to visually achieve maximum surface texture, extreme side light is the answer. Texture is that all-important tactile quality of what the subject feels like; as in does it feel smooth or rough.
The image below is lit with the same Speedlight and softbox to the far right of the subject. This image produces maximum detail and texture of the acorn and the surface of the caps.
Backlight, while sometimes difficult to work with because of little definition to front details, provide a maximum understanding of shape, a two-dimensional quality. Backlight can separate the subject from the background and produce a striking edge-light or “halo” around our subject for maximum definition. In the image below, the single Speedlight and softbox is placed behind the acorns. The image illustrates maximum shape and edge detail, but is lacking in front surface detail due to insufficient light from the single source.
Now, as it turns out, we may use more than only one style of lighting direction; a mixture is frequently best. Here the lighting is predominant back light with a front fill card. This image provides more information, better illustrating the acorns and the detail of the caps.
In addition to direction, lighting quality is vastly important as well. Small point light sources create hard, high contrast light. A point light source is very small in relation to the subject and directional. The light from our sun is actually small (you can cover the sun with your thumb at noon) and directional, creating lots of unflattering, dark shadows.
On the other hand, large and broad light sources are much softer, especially when close to the subject. An overcast sky is a perfect example of a large light source; the clouds themselves act as the large source of light. Let’s look at some specific examples.
In the first two images below the light is a single off-camera Speedlight flash both at the same distance (2 ft.) from the subject. In the left image the flash is unmodified and the right uses an 18 inch diffuser in front of the Speedlight. The first has considerable more specular reflections and sharper (harder) shadows; the next with the larger light source is more diffused, both in the highlights and shadows. The larger the light source, the softer the light and less contrast.
The quality of the light is also subject to the size of the light source relative to the subject as a function of its distance from the subject. In the four examples immediately below, the light source is the same exact fixture — an eight-inch softbox on a Speedlight. In the top examples the light source is six feet from the subject. In the lower images the light is only one foot away.
When the light source is at a distance it seems small as below, shadows are at their maximum and spectral highlights are small and hard. Look at the detail of the reflection from the light source. (Closeup second below).
When the light source is large (closer) as below, shadows are at their minimum and spectral highlights are large and soft. (See the next closeup.)
The images below are shot with a very soft lighting technique making use of a large light, close to the subject with reflectors and diffusers, resulting in less contrast, less shadows and more diffused highlights. This is a technique used frequently for shadow-less lighting with diffused specular highlights, like shiny metal or glass objects.
So after all that, let’s take a look at some examples where direction and quality play an important role in making or breaking an image. The images below are of the skull of a white-tailed deer. This animal was probably killed by being hit by a car resulting in the crushed skull as shown here.
The first image is taken with the light suggested for everything. Near axial, front lighting with a softbox on an off-camera Speedlight flash. The enlarged detail shows the image is well lit and exposed and illustrates the subject and the trauma.
The image below however, used side light with the same Speedlight and softbox. This image illustrates more detail than the first as the sidelight creates more texture, giving more definition to the bone and its structures. This is clearly visible in the enlarged detail.
The last week of September, I took a short trip to Rocky Mountain National Park in Colorado. In addition to getting some much-needed “away time”, I wanted to photograph Elk in the rut and the colorful Aspens at their peak. I was surprised to discover that I arrived at the best week- for both!
Nikon D-800, 600mm F4.0 Nikkor lens, tripod.
The bulls and their hormones were very active and good images were easily found. The color was a bit splotchy as there was a previous beetle kill in the the pines. But a little perseverance paid off with some nice color.
South Texas Bird Photography Workshop •Laguna Seca Ranch Edinburg, Texas • October 23-26, 2014 • February 27-March 1-2015
This instructional, hands-on bird photography workshop is located in the heart of the South Texas flyway. The October workshop features a half-day of hands-on instruction and a day and two and a half days of shooting (or a day and a half in February ) in some of the best South Texas birding habitat available where neotropical South Texas varieties abound.
The workshop will be held at the Laguna Seca Ranch north of Edinburg, Texas in the heart of the lush Rio Grande Valley. The facilities of the 700-acre ranch are purpose-designed for photography and preserved with all native species. It features four constant-level ponds, each with permanent photography blinds oriented for the best use of light. A fifth blind is set up specifically for raptors.
Each location has been hand-crafted to provide the most outstanding bird photography opportunities. With nearly eighty species found on the property, Laguna Seca Ranch clearly offers a uniquely outstanding South Texas bird photography adventure! Many photographers have added numerous birds to their species life list while at the workshop. Read the website for their testimonials.
Ten avid participants from as far away as Minnesota discovered great surprises as they developed new skills in the exciting small world of macro photography. The workshop was held in the heart of the Texas Hill Country at the historic Mo Ranch Conference Center in Hunt. Everyone expanded their understanding and skills through classroom instruction, and intensive, hands-on field and lab photography sessions.
Participants said their macro images are much better than any they would have taken before this instruction. Most participants were also in for a big surprise as they learned precisely how little DOF their macro lens has. All appreciated learning how to use flash to improve their work and learning to use Live View for better focusing on tiny objects.
Of special interest was the use of a macro focusing rail, focus stacking, flash for additional depth of field and techniques for mitigating wind.
Mo Ranch was a really great place to hold the workshop–very relaxing and lots of nature to photograph. Participants would definitely recommend this workshop to others.
Several of the images from the workshop are shown below:
In macro photography we are supplied with a variety of components for fine-tuning focus. This equipment includes focus slider rails and built-in sliders as part of a bellows. All of these devices facilitate changes in focus by moving the camera closer or more distant from the subject.
All of these components work quite well; some better than others. A well-made slider (above) can provide infinite adjustments in focus with extremely small changes in distance. These are ideal for gross specimens or single shot macro images.
Bee head. 53 images stacked in Helicon Focus. Nikon D2Xs, 50 mm flat field EL Nikkor lens on bellows, two SB-800 flashes, tripod. Image magnification in camera: 1.6X.
However, when enhanced depth of field of tiny subjects is required through focus stacking, moving the camera may not be the most ideal method of changing point of focus. With very small insects like the bee above for instance, many exposures–perhaps 50 or more– must be produced over a distance of less than one centimeter.
Several problems are presented. First, the mass of the camera, bellows, and lens assembly is great. Moving it smoothly and accurately may not be possible. Second, the focusing rack and pinion may have coarse threads, not suitable of minute adjustments. Further, the camera, bellows and lens combination when moved is subject to unwanted vibrations. The answer therefore, is to move the subject, leaving the camera solidly stationary.
Macro subjects like those encountered for focus stacking are most frequently tiny and present no above mentioned problems. They are small, lightweight and can be easily and smoothly moved. And making repeated movements at uniform dimensions is practical. All this suggests that moving the subject instead of the camera is an ideal solution.
In my photography, I use two devices. For single shot macro I have converted an Olympus microscope stage for an X-Y-Z motion platform in the image below. It has a movement of 3 inches in left-right and fore-aft directions and a vertical movement of just under 1 inch. In addition, it has a 2 x 3 inch hole for sub stage illumination. All movement controls are under the stage so they are perfectly out of the way.
For focus stacking I use a single-axis micrometer linear positioning stage. Movements are possible along the lens axis for focus stacking in uniform increments as small as 0.001 inch. The movement for this stage is only one inch, but that is more than adequate for most focus stacking tasks. To center and align the subject, I use the gear head on my heavy duty Gitzo tripod. As illustrated in the photograph below, everything is locked down tight. Consistent, vibration-free images are possible with this set-up.
For the ultimate in focus stacking, a motorized linear positioner like StackShot® by Cognisys makes life easy. The price is affordable if a lot of focus stacking photography is required. Even with the StackShot it still makes perfect sense to move the mole hill not the mountain!