Ants in detail

It’s often hard to visualize the tiny anatomical structures on these small creatures. With proper tools and techniques, exceptionally good detail may be revealed, even on the smallest of ants, if a photographer diligently practices an often overlooked,  non-technical skill — patience.

Ants are small indeed, and fast. At macro magnifications it’s difficult and often impossible to chase living specimens with a lens and to expect a quality outcome. Like experienced wild game hunters, it’s best to let the subject come to the lens. To chase the insects, you must try to hit a moving target with a moving camera and that procedure introduces unwanted image degradation into the equation.

In the image below, this Acrobat ant (Crematogaster sp.) was reproduced at a sensor magnification of  2.0X with the use of a macro lens on a bellows. A 105 mm macro lens was selected to provide excellent resolution and adequate working distance between the subject and the front of the lens. This procedure precludes shadows of the lens barrel on the subject area and allows sufficient room for electronic flash.

My method is to isolate several ant subjects on a small mound of clean pebbles surrounded by a moat of water as illustrated in the bottom image below. If assembled carefully, the ants will remain within a small area. That confining stage can be set up in a petri dish or other suitable shallow dish. The pebbles may be contained in a bottle cap or something similar. The trick is to bring the level of the water to the lip of the cap so the ants don’t run all over the place and off the gravel mound.

After a while you can notice the ants establish a trail and may follow each other around and over the pebbles. The trick now is to select a preferred spot, pre-focus and wait. Shoot the picture with a suitable shutter speed of 1/150 to 1/250 second and with electronic flash providing some motion-stopping assistance and acceptable depth of field. This procedure requires considerable patience and persistence to achieve good results. Don’t worry if your first attempts contain only the south end of north-bound ants, or worse, just a leg or antennae. Stick with it. Good results will follow.

So when you become frustrated, remember Brian’s 7-P rule of nature photography: Prior planning, patience and persistence pays in prime performance!

Nikon D2Xs, PB-4 bellows on tripod with 105 mm F 4.0 Macro lens, SB-800 flash and diffuser.

© Copyright 2011 Brian Loflin. All rights reserved.

Lens resolution

We photographers are often pretty pleased with many of our images. We enjoy the subject, color, composition and detail of our photographs. But since we are our own best critics, we often wonder if we are getting as much detail as possible. This question raises its head more often in macro or extreme close up photography than in other areas. Let’s look at some of the reasons why.

Several factors affect image quality. Quality of the optic itself, camera movement, subject movement, and lighting are several factors that can affect the resultant details of a photographic image. In the macro world where the subject is reproduced at magnifications of life-size or greater, each of these factors plays a major role.

As macro photographers we know that we must eliminate all motion from our subject and optical system. So we bolt everything down, using heavy stands, tripods, electronic releases, mirror lock-up and anything else we can rig to eliminate the possibility of image deterioration from vibrations. We also understand that perfect exposure using quality lighting from a bright, white source like a strobe or speedlight flash is best. And we do everything to prevent flare, glare or unwanted reflections from further deteriorating the image. We are there. Or, are we? What’s left?

The remaining factors have to do with the reproducing quality of the lens itself. Let’s call this lens resolution. This is a measure of the capacity of the lens to reproduce tiny details and may actually be measured by standardized resolution scales expressed as lines per millimeter, or now more frequently, line pairs per millimeter (LP/mm). Basically, resolution quantifies how close lines can be to each other and still be visibly resolved, or distinguished as separate. For example, a resolution of 10 lines per millimeter means 5 dark lines alternating with 5 light lines, or 5 line pairs per millimeter (5 LP/mm) may be visually distinguished as separate.

In the lab we measure lens resolution by photographing a standardized test target. This is known as the 1951 USAF Resolution Target. It is a 2 x 2 inch optical glass slide with test patterns deposited onto its surface. These targets are available from several sources including Edmund Optics. In use, this target is photographed with the subject lens at the desired magnification with all due precautions discussed above. The final image is visually inspected and, with the supplied chart, the resolving power is determined.

The USAF test target is shown below in the top image, along with an actual resolution test photo of a macro lens in my lab.

The test above demonstrates a resolution of 161 LP/mm or 322 lines per mm. This is exceptional quality resolution, even under ideal conditions. This test was performed with a Zukio 20mm F 2.8 macro lens mounted on a bellows (Magnification: 7.4 X on the sensor) and a Nikon D2Xs camera. Backlight  Illumination using a SB-800 speedlight.

So, we can see that many factors affect our images. It’s our job to reduce the potential for problems where we can and invest in the best glass we can afford. It does make a difference.

© Brian Loflin. All rights reserved.


Dragonfly aquatic nymph

Occasionally, it is required to illustrate a living aquatic specimen in its environment as naturally as possible. To do so requires high magnification and image resolution, clear surroundings and quality lighting in order to produce true-to-life colors.

To produce these images, I turn to photography in tanks sized for the subject. I build tanks from glass glued together with silicone aquarium cement. I use a wide variety of sizes from 25 mm square up to a few gallons. Frequently, I make a tank just for the subject at hand.

In the case of the dragonfly nymph below (Images 1 and 2), I made the tank out of standard microscope slides that measure 25 x 75 mm. The tank interior compartment measures about 40 x 20 x 25  mm. This tank (Image 3) can house the dragonfly nymph very nicely.

Image 4 illustrates the overall setup with a SLR camera, bellows unit and close focusing lens. The entire camera assembly is securely mounted on a heavy tripod and the tank is on a solid stand. Elimination of vibrations is critical.

At these bellows extensions, light loss is significant. I find that a single, diffused Nikon SB-800 speedlight provides sufficient motion-stopping illumination, adequate depth of field and daylight white balance. With a dedicated cord, the flash exposure is synchronized and measured TTL in aperture priority. This arrangement satisfies the objectives previously stated very well.

Nikon D2Xs, PB-4 bellows, with 35mm F3.5 Macro Nikkor bellows lens and single SB-800 flash. Image 1 and 2 magnification at 4.0X and 6.0 X respectively on the sensor.

© Brian Loflin. All rights reserved.


Emerging damselfly slideshow

Recently, I resurrected some interesting images produced when I had the opportunity to witness several damsel flies emerge on a warm day while photographing on a local property. This series was shot one year ago on April 14, 2010 in a pond here in Austin.

The insect is a male Desert Firetail damselfly (Telebasis salva). It is emerging from the aquatic larval state to the winged flying adult. The nymph has climbed out of the water, inflated itself with air and begins to split its skin on the top of the head and thorax. It then begins to pull itself completely out of its skin. The wings and abdomen inflate as blood is pumped through them. This newly emerged teneral is very vulnerable and barely able to fly. It may remain here for quite a while until its muscles and structures harden. It then establishes a territory where it will mate and begin the cycle once again.

The series of images was made with a Nikon D2Xs digital camera with a Micro Nikkor 200mm F4 macro lens. For this sequence, I shot 88 JPEG images over a period of one and a half hours. I used 58 of those images to make the video clip in Lightroom 3.3. No computer enhancement or manipulation was done. The series is synchronized to the instrumental soundtrack “Africa” (#1009) by InstantMusicNow.com, for which I paid a fee for the reproduction rights.

Thanks to my dear friend and colleague, Cindy Dyer, for her YouTube post of my 1080p video file and to my friend and odonate specialist,  Dr. John Abbott, for his detailed knowledge of damselflies.

© Brian Loflin. All rights reserved.


Primrose HDR made simple

Texas wildflowers are out and about. This is not a great year like last, but flowers abound if you search. One of the more common this week is the Showy primrose (Oenothera speciosa). It is not a spectacular flower, only about 2 in across.

To make this flower stand out in a photograph I decided to produce a simple HDR (High Dynamic Range) image with only two frames 1.0 F stop apart. The first was exposed on the money and the second, under exposed. Combined in Photomatix Pro 4.0.2 software, the resulting frame has more “pop” than the single frame.

With HDR photos of wildflowers windy conditions are a severe handicap. Wind breaks and high shutter speeds can help. However, making several images without movement is rarely possible. Therefore, it’s nice to know that a combination of only two images will still produce pleasing results.

Image capture with Nikon D2Xs and 200mm F4 Micro Nikkor lens in natural light.

© Brian Loflin. All rights reserved.


Macro panorama

Most frequently macro photographers have learned to align the long dimension of the subject with the long dimension of the image frame and to move in as close as possible to get a frame filling composition. In macro imaging that means the magnification ratio of the resulting image is limited by the maximum angle of view of the lens used.

Today, with the advent of digital imaging, a method has been devised to increase magnification by turning the camera axis with the long dimension across the subject long dimension centerline. Then, a series of overlapping images can be made and stitched together seamlessly in the computer, increasing the magnification by a factor equal to the aspect ratio of the camera sensor or about 1.5 to 2.0 times (or more) the original. This will produce additional subject detail often required in macro reproductions. Multiple rows of stitched images can increase the magnification even more substantially.

Let’s look at the images below:

In image 1 above this fossil fish has been recorded at a magnification of 0.18 X in one shot with a Nikon D2Xs and a 60mm F2.8Micro Nikkor lens. In image 2 the reproduction is 0.68X using five overlapping images stitched in Photoshop CS-5. (In this blog the two images are reproduced at the same width. In actuality, the larger image is nearly twice a large.)

Image 3 illustrates the setup used. Camera is mounted on a heavy vertical stand and the specimen is on a X-Y mechanical stage as seen in detail in image 4. Lighting is with two SB-800 speedlights in Nikon Advanced Wireless i-TTL mode. Notice the master flash is connected to the camera via a dedicated SC-29  remote cord.

© Brian Loflin. All rights reserved.


Teaching wildflower photography

Recently I was invited to teach a short workshop on wildflower photography at the Mueller Development prairie at the site of the old Austin airport. The weather was nice but for the wind. Wind seems to always provide a hardship for flower photography. I coached the attendees including my dear friend and long-time colleague, Cindy Dyer, how to make a wind break from three sheets of foam-core board hinged together into a triangle. This bluebonnet (Lupinus texensis) is one of the resulting images of the day.

Nikon D-300 with 105mm F2.8 Micro Nikkor. Natural light, diffuser.

© Brian Loflin. All rights reserved.


Leafcutter ants

Leafcutter ants (Atta sp.) harvest a wide variety of leaves and store them underground in their nests.  Leafcutter ants have a  social structure that is regimented into finite divisions of labor. This worker is carrying a leaf cutting many times its own body weight back to the nest. This plant material is not for food, but is a substrate media upon which a fungus is cultivated for food for the colony. Shot in Costa Rica with Nikon F5 on Fuji Provia 100 film with 55mm F3.5 Micro Nikkor (1:1) and flash.

© Brian Loflin. All rights reserved.


Leafcutters, Austin style

Many folks believe that leaf cutter ants live only in the rainforests of the world. Contrary to that belief, this leaf cutter ant (Atta texensis) is a resident of Austin. Several large colonies are found in the area and increase in distribution throughout south Texas. Nikon D2Xs with 200mm F4 Micro Nikkor. Natural light and fill flash.

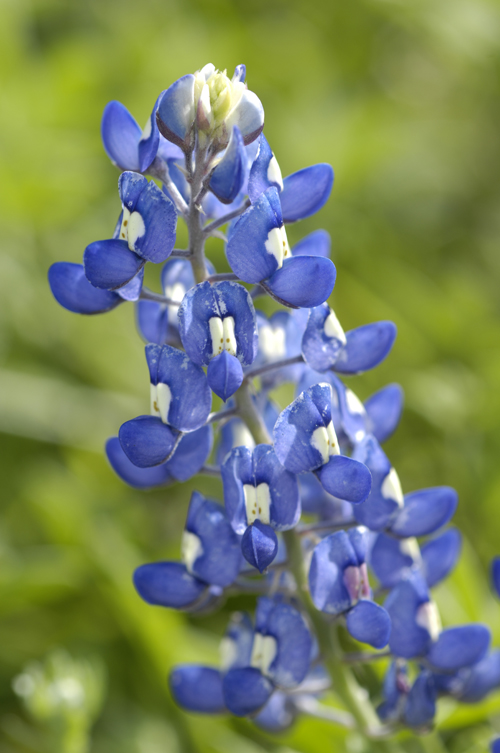
Texas Bluebonnet

Lupinus texensis

The Texas bluebonnet (Lupinus texensis) is the state flower and is a sure sign of spring around the state. Often in wet years large expanses of this and other wildflowers cover the roadsides, medians and pastures and fill the air with a wonderful fragrance. Nikon D2Xs with 105 mm F 2.8 Micro Nikkor.